- Programming in Objective-C 2.0
I'm 4-5 chapters into the book. So far it seems comprehensive and the book assumes you don't have prior knowledge of the C language. - Learn Objective-C on the Mac
I'm also 4-5 chapters into this book. It assumes you have prior knowledge of C, but its written in a rather easy to understand style. - Beginning iPhone Development
Same as the previous two books, I got to about 4 chapters in. This book recommends having read the previous book before reading this one. Even though I don't have Objective-C down yet, the first few chapters does a very good job of explaining the parts and components of an iPhone app.
Friday, February 27, 2009
Learning to make an iPhone App: Entry 1
Wednesday, February 25, 2009
Guide to GTD: Setting up a reference system on a Mac
Now that operating systems contain quite advanced search capabilities, some people might not even need a system to organize their files. You can simply put everything you need in one folder, and add Spotlight comments to retrieve them later. If you are a Gmail person and are used to tagging your emails, the software Tags lets you tag files and folders on your Mac.
As for me, the first thing I do when I need a file is to use Spotlight. However, I still can’t find everything through searching. So I still have a file system in place though I limit the layers of folders. Having files in an organized manner also gives me peace of mind =)
My Setup
Digital files are stored in a folder called the Cabinet. Inside the Cabinet are subfolders. I categorize my materials by their type. For example, receipts, letters, statements, and etc. My logic is that if I’m looking for something, in my mind, it probably goes something like this - “I’m looking for [some type of thing] for [some purpose or subject]”. For example, I’m looking for the invoice for January’s hosting. Therefore, I would go to the invoice folder and look there.
Here are some of my folders:
Agreements and Contracts
- Documents
- Forms
- Instructions and Manuals
- Inoivces
- Letters
- Meeting Notes
- Projects
- Receipts
- Statements
Searching by A to Z
Unlike physical files, where you can only organize in one way, digital files can be organized in several ways using things like tags and smart folders.
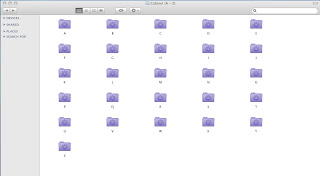
I have a a folder called Cabinet (A-Z), and inside the folder are Smart Folders of A to Z. This enables me to look through things alphabetically. For example, clicking into the A folder will bring up all the things that start with A in my Cabinet folder.

Normally, if you try to create a Smart Folder, it will attempt to search across the entire computer. In this case, we want to limit the scope of the search. To do so, first go to the folder where you want the search to take place. Type something in the search box in the Finder window. A bar will appear that will give you the option to search “This Mac” or the folder you’re currently in. Select the folder you want to search and click the + button to the right. This will bring up a criteria for search that you can configure. In the case of setting up an A folder, set it up so that it searchs for name that begins with “A”. Click the Save button to save it as a Smart Folder.

Searching by kind of files
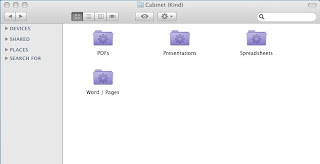
I also set up folders where I can search by the kind of documents. For example, Word documents and presentations.
I put these Smart Folders in a folder called Cabinet (Kind).

Folders Outside of the Cabinet
Other than the cabinet folders, there are two other reference folders on my desktop.
- Frequently used files - For example, files that I use to keep track of expenses.
- GTD - This folder contains information about my GTD setup such as a list of my collection points.
It is important to always remember the reference system is not a place to store potential actions or tasks. If you do, you have to make sure to review those folders. For me, the Projects folders is such a folder. Ideas are also things that imply an action that you may want to do, so you want to make sure you revisit ideas if you place them together with other reference materials.
Tuesday, February 24, 2009
Sunday, February 22, 2009
Guide to GTD: Collecting
The GTD process starts with collecting stuff. Stuff includes:
- stuff that could be useful in the future
- stuff that imply a task or action
- stuff that needs your attention
Collecting in the real world
For actual papers, bills, letters, and other stuff in the real world, I just simply dump them all into an physical tray. This is where everything goes.
The other collection point is my notebook where my ideas and notes are stored. I take my notes in a report pad that has pages with the Cornell Method layout. As you can see in the photo below, each page is separated into three sections: 1) note area, 2) key word area on the left column, and 3) summary area on the bottom.

If you can’t find a notebook in this layout and would like to try this layout, here’s a web tool where you can create and print your own.
For the digital world, it gets complicated
Unlike the real world, ironically, the digital world is not that simple. I’d wish I could have one inbox on my computer where I can dump everything and view them efficiently later, but I haven’t found a great solution like that.
In the digital world, stuff have types, and we manage our stuff in different software. Emails in email software. Notes in note-taking software. Documents in our file system. Tasks in our task management software.
I’m still looking for that perfect solution that lets me view and manage emails, notes, and documents all in one centralized location. I think Midnight Inbox is pretty close to getting it right. There are lots of great GTD software out there, and I'm sure we'll see something that ties everything together nicely.
For now my digital setup is:
- Inbox on the file system (Mac)
- Inbox on Things (Mac and iPhone)
- Inbox in Mail (Mac and iPhone)
For now, I’m trying to use Things, a task management software, to capture notes. I actually prefer the Notes application on iPhone because of its simplicity and fast loading time. However, that would increase my collection point to two on the iPhone, so for now, I’m going to try to use Things to capture notes and tasks.
Evernote, a really cool software, is worth mentioning. It allows you to capture notes and sync them across computers and devices. After testing it out for a month or so, unfortunately, I’m deciding to leave it our of my set up. My reasons are:
- the iPhone app takes a while to load
- it becomes an additional collection point
- it stores data and stuff on servers, and there are some business docs and data that I’m not comfortable of putting in the clouds
Collecting stuff on Mac
Mails are collected in the Mail application on my Mac. Files such as documents, presentations, and bookmarks are all dumped into an Inbox folder. Actions and tasks are captured through Things.
Taking notes on Mac
Currently, I’m not using a single software to capture notes. There are several ways I refer to for taking notes:
- sending myself notes via email, which will end up in the email Inbox
- writing up a note in TextEdit, Pages, or Word, and putting them in the Inbox folder
- notes that should be viewed frequently or notes that could suggest a future task are usually done in Together, and putting them in the right place / category at that moment (I will discuss how Together fits into my setup in a future post)
Lastly, I'd like to talk about sub-collection points, which is a terminology that I made up. These are places that just accumulate stuff. For me, these are:
On my Mac:
- Desktop (out of habit, though I try to drop everything into the Inbox, files just accumuluate here)
Real World:
- wallet - receipts pile up here
- business card holder - business cards of contacts pile up here
They key is to make sure to have the sub-collection points processed or dumped into main collection points (i.e., inboxes) on a regular basis. If sub-collection points aren’t consolidated, that prevents you from collecting everything and creating a loophole, which means you may forget something or some task. To make sure you do this, you will need a system for recurring/repeating tasks to make sure you do this. This will be covered in a later post, of course.
Takeaway points
Hopefully the above gives you some idea on how you can approach setting up a system to collect stuff. No matter what system you use, just make sure the system can consolidate everything into a few centralized places.
That’s all for collecting. Hope you find it helpful and thanks for reading!
Wednesday, February 18, 2009
SWG’s Guide to GTD on Mac and iPhone
I took most of my blogging time for the past two weeks to try to accomplish one of my resolutions this year: implementing “Getting Things Done” (GTD).
What is GTD?
For readers that don’t know, GTD is a methodology and framework by David Allen to help you manage your tasks at home and work. The core workflows of GTD is:
- Collect
- Process
- Organize
- Review
- Do
You can find more information at Wikipedia’s entry on GTD and David’s Allen’s book, Getthing Things Done.
So basically, in the collection phase, you are devising a system that can capture all the things that goes on in life.
In the processing phase, you have to sort that pile of stuff into three piles
- trash
- things that have reference value
- actions or things that may suggest an action
Organize
In this phase, you have two piles from the previous step:
- things that have reference value -
These are things that should be filed away in a reference system. - actions or things that may suggest an action -
Most likely, you will end up with a big list of actions. The list will probably have too many items for mortals to comprehend, and, therefore, we must break down this lists into multiple lists so that we can comprehend. After these actions are organized, we are then able to make sense of them and extract the actions or tasks that should be done. The critical part is trying to devise a system so that you actions are properly captured and get visibility at the right times. In other words, actions needs to be reviewed so they are not just buried and get forgotten.
Review and Do
These two phases lets you find out what you should do next, and then do them.
The tools
For me to implement GTD, my setup involves the following tools.
Hardware
- iMac
- iPhone
- physical inbox tray
Software
For the next few posts, I’ll be writing about my experience implementing GTD. In particular:
- Collection points setup
- Setting up the reference system
- Processing and organizing actions and tasks
- Recurring actions
- Critical tasks to allow GTD to work
Hope you will enjoy this series of posts and find it insightful! Thanks for reading!
Monday, February 16, 2009
Tiny tiny miscro SD card reader from Buffalo
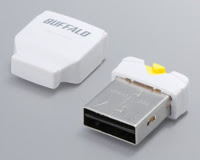
I'm not sure how small these card readers can get. But Buffalo's BSCRMSDC micro SD card readers are pretty small.
Saturday, February 14, 2009
i-Station Rotate - A speaker system that docks iPhones and touches horzontally

The problem with speaker systems for iPhones and iPod touches right now is that they dock vertically, which means you can't really watch your videos unless you tilt your head 90 degrees.
Friday, February 13, 2009
A power outlet wannabe USB hub from Elecom
 The U2H-TC410BWH from Elecom is an 4 port USB hub in the form of a power outlet. It has magnetic plates in the back so that you can attach to your desks. Of course, if the magnets don't work for you, they can also be attached with screws.
Thursday, February 12, 2009
a stylish desk light that also works as a USB hub and charging station
- In addition to being a light, tt serves as a 2 port USB hub.
- These USB ports can also charge devices for you when your computer is not connected. (Though it seems like you need a special adapter for iPods)
- The back side contains an extra power outlet
Wednesday, February 11, 2009
The hard drive for Lego lovers - LaCie Brick Desktop Hard Drive
 If you love legos, then you might want to check out LaCie's Brick Desktop Hard Drive.
Tuesday, February 10, 2009
Elecom Optical Egg Mouse
 These mice from Elecom are designed after eggs and come in an assortment of colors including white.
Monday, February 9, 2009
Keep your cables tidy with the CableBox
From the makers of the SpaceStation, the CableBox is a box that hides those tangled cables and power strips.
Sunday, February 8, 2009
blueLounge SpaceStation: desk organizer + USB hub + charging station
Just check the video below to see what SpaceStation is and can do.
Saturday, February 7, 2009
Roundup of Apple + gadgets news and blogs
Just compiled a collection of feeds from blogs and sites about Apple and gadgets. You can check them out on my Netvibes page. Enjoy!
Friday, February 6, 2009
Barouche - BR-03
 A simple alarm clock from Barouche. Its features include:
- clock
- alarm clock
- world clock
- thermometer
- snooze
- backlight LCD
Thursday, February 5, 2009
Princeton Tablet Monitor (19 inch)
 I've always liked the idea of a tablet where you can write directly on the screen. I'm not an artist, but I'd imagine it'd be useful when editing documents or simply jotting down something for someone to see. Apple doesn't have any tablet notebooks, so we have to turn to another 3rd party solution.
Wednesday, February 4, 2009
Watching live TV on iPhone in Japan with SoftBank's TV&Battery
SoftBank released a gadget called "TV&Battery" for the iPhone 3G in Japan last month. This gadget lets you watch TV and charges your iPhone as well. It charges the iPhone with a cable. For TV, it serves as a tuner and streams the contents via wifi.
- Turn on TV&Battery and pull out the antenna.

- Go to Settings>Wi-Fi on your iPhone. You will then see a network created by the device. Select that network.

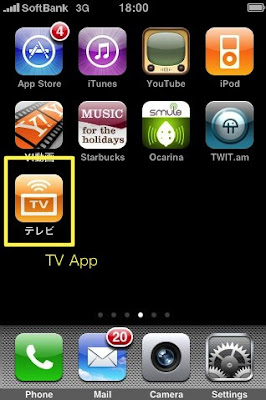
- Go back to the home screen and load the TV app (free from Japan's App Store).

- And there you have it. The list of channel with the program info comes up.

- Select a channel, and start watching.
Tuesday, February 3, 2009
Review: Keynote Remote App
 Up till last month, the official way to control Keynote was to use the Apple Remote. At MacWorld last month, Apple released the Keynote Remote app for iPod touch / iPhone. The app costs $0.99 and with it you can control your presentations with your touch or iPhone.
- one less thing to carry
- you can see your notes (in portrait mode)
- you can see your next slide (in landscape mode)
- it's connected via wifi so you don't have to worry about pointing anything to your computer and make sure it receives the signal
- extra step of setting up and make sure your iPhone is linked with your computer via wifi
- if your presentation is filled with videos, the Apple Remote may be preferred. As the Keynote Remote app does not have any video or playback controls for the videos. This means you can't pause or rewind during when a video is playing.
- if you usually stand rather close to your computer for presentations
Sunday, February 1, 2009
Adding a mobile monitor and web cam to my Mac Mini media center
This is part 4 of Transforming a Mac Mini G4 to a Media Center. Links to the last three parts of this series is at the bottom of the post.
- store and stream music and video
- play music and video using Front Row
- watch and record TV
- make video calls through Skype
And here is all the software and hardware so far:
Additional Software:
- Activate Front Row
- Perian
- Skype
Additional Hardware:
- DVI to Video Adapter
- Mobile Monitor Color LCD Screen for GameCube (InterAct)
- Logitech QuickCam Ultra Vision SE
- Keyspan’s Front Row Control
- iPod touch and iPhone with Remote app
- Elecom USB 4 Port Hub
- Yamaha NX-U02
- TV tuner from I-O Data
Other:
- Enabled Mini for Apple Remote Desktop so I can screen share with Leopard
- Use an nice Mini icon for the user picture


